Most people assume drawing a rose requires years of art training. In reality, the challenge isn’t technique — it’s knowing where to start. Once you understand how a rose is actually built, petal by petal from the center outward, the whole process becomes logical rather than intimidating.
Why roses trip up beginners (and how to stop that from happening)
A rose looks complex because it is layered — but that layering follows a pattern. The mistake most beginners make is trying to draw the whole flower at once, working from the outside in. Professional illustrators and botanical artists do the opposite: they establish the center spiral first, then build outward in stages.
Before picking up a pencil, spend thirty seconds looking at a real rose or a clear reference photo. Notice how the innermost petals curl tightly around each other, while the outer petals open wider and slightly droop. That contrast — tight center, loose exterior — is what makes a drawn rose look alive rather than flat.
What you actually need before you begin
You don’t need specialized supplies. A standard pencil (HB or 2B works well), a sheet of smooth paper, and an eraser are genuinely enough for learning the basic rose sketch. If you want to add shading or color later, a set of colored pencils or even watercolor pens can be layered on top.
| Tool | Best for | Notes |
|---|---|---|
| HB pencil | Light guidelines and structure | Easy to erase and adjust |
| 2B pencil | Soft shading and petal curves | Smudges nicely for depth |
| Fine-liner pen | Clean ink outlines | Use after pencil lines are confirmed |
| Colored pencils | Gradual color layering | Work light to dark |
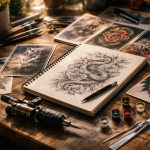
How to draw a rose step by step
The method below breaks the process into stages that build on each other naturally. Each step is short enough to complete in a few minutes, which means you can pause, assess, and adjust without losing track of where you are.
Step 1: Draw the core spiral
Start with a small, loose oval near the center of your page — this represents the tightly furled inner petals. From one side of that oval, draw a slightly curved line that wraps around it like a loose letter C. This becomes the first visible petal enclosing the center. Keep it light; you’ll refine it later.
Step 2: Add the second and third inner petals
Attach two more petals around the spiral, each one slightly larger than the one before. Think of them as cupped shapes — their edges curve upward like a hand holding water. These inner petals don’t open flat; they have a visible concave curve at the top.
Step 3: Build the mid-layer petals
Now add three to four wider petals around the inner cluster. These sit slightly lower and begin to open outward. Their tops can have a gentle wave or slight fold at the edge — that irregularity is what prevents the drawing from looking artificial. Avoid making all petals the same size or shape.
Step 4: Draw the outer petals
The outermost petals are the largest and most relaxed. They droop gently at the sides and their edges can be slightly uneven. Add four to six of these around the mid-layer, letting some overlap others. Overlap is important — it creates a sense of three-dimensional form.
Step 5: Add the sepals and stem
Below the flower head, draw five narrow, pointed shapes — the sepals — that fan out from the base. These are the green leaf-like parts visible beneath the petals. Then extend a slightly curved stem downward. A single stem without thorns looks clean; adding two or three small thorns makes it more realistic and botanically accurate.
A rose drawing gains believability not from perfect symmetry, but from carefully placed asymmetry — slightly uneven petals, a hint of shadow, one edge curling more than the other.
Shading a rose: turning a flat sketch into something that has volume
Once your outline is complete, shading is what transforms a line drawing into something that looks three-dimensional. Decide where your light source is — typically upper left or upper right — and keep it consistent throughout.
- The inner petals near the center are always the darkest area, since little light reaches inside the bud.
- The mid-layer petals have moderate shadow on the side facing away from your light source.
- The outer petals catch the most light and should remain mostly light in value.
- The underside of any petal that overlaps another receives shadow where the two petals meet.
- Leave small highlights — unshaded areas — along the upper edges of outer petals.
Use hatching (parallel lines) or gentle circular strokes to build shadow gradually. Pressing harder creates darker tones; lighter pressure gives soft mid-tones. If you’re using a 2B pencil, you can smudge lightly with a fingertip to blend transitions between light and shadow.
Common mistakes that are easy to fix
Even people who follow a clear tutorial often run into the same few problems. The good news is that most are easily corrected once you know what to look for.
- Petals that look like separate leaves — fix this by making sure petals partially overlap and share edges.
- A center that looks like a flat circle — add the spiral line and tighten the inner petals around it.
- Stiff, perfectly rounded petal edges — introduce slight waves and one or two small notches for a natural look.
- No depth or volume — this is almost always a shading issue; even minimal shadow at petal overlaps makes a visible difference.
- Proportions that feel off — keep the flower head roughly as wide as it is tall for a classic rose profile.
From pencil sketch to different styles and mediums
Once you’re comfortable with the pencil version, the same structural logic applies across different styles. A loose watercolor rose uses the same petal layering but relies on wet washes rather than line work to define form. A botanical illustration style calls for precise, thin outlines and careful observation of real specimens. A stylized or cartoon rose simplifies the petal count and exaggerates the spiral at the center.
Digital drawing tools — tablets with pressure-sensitive styluses — allow you to work in layers, which is particularly useful for roses since you can draw the center on one layer, mid-petals on another, and adjust each independently. The underlying structure, however, stays exactly the same as the pencil method described above.
Whether your goal is realistic rose drawing, a simple rose sketch for a card, or practicing flower illustration as part of a larger project, the foundation doesn’t change. Learn the spiral center, understand how petals stack and overlap, and pay attention to where light falls. Everything else — style, medium, detail level — is secondary to getting that core structure right.